
Discover all our new features and optimizations for resource scheduling.
RESOURCE SCHEDULE 🎉
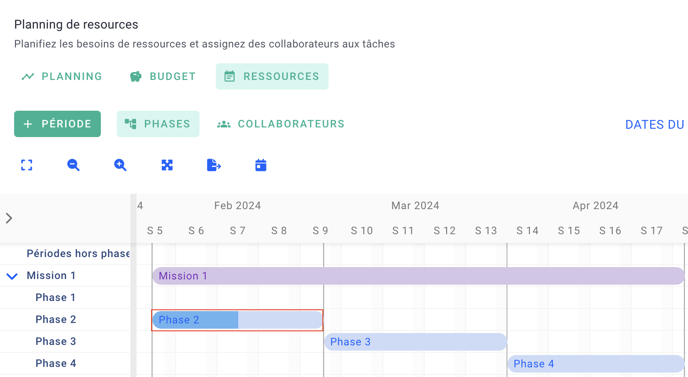
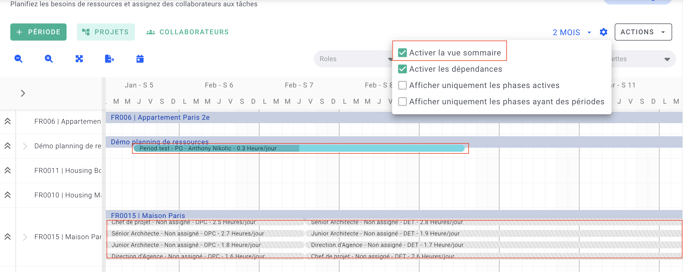
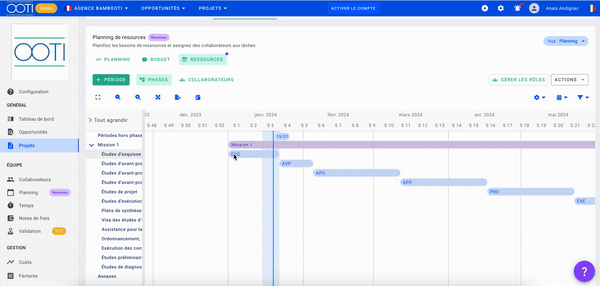
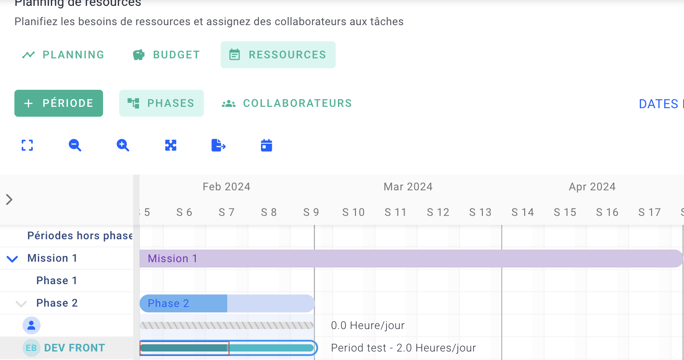
📌 A new interface
We have improved the interface to make it more readable:
- Less information on periods, we encourage users to open the period if they want more details
- Visibility of week structures and days not worked generally in the background of periods rather than cutting out the period as in the previous version
- Less information on periods, we encourage users to open the period if they want more details
- Visibility of week structures and days not worked generally in the background of periods rather than cutting out the period as in the previous version
- Visibility of the progress of production phases on the resource schedule
- Users can choose to show or hide certain items/actions on their schedule
- User avatar or initials available in the left-hand menu
- At team planning level, users can display a summary view to get an overall view of the periods for all their projects.
- Zooming can be done directly on the schedule with the mouse: scroll forwards or backwards to zoom in or out and with a trackpad zoom in or out with your fingers.
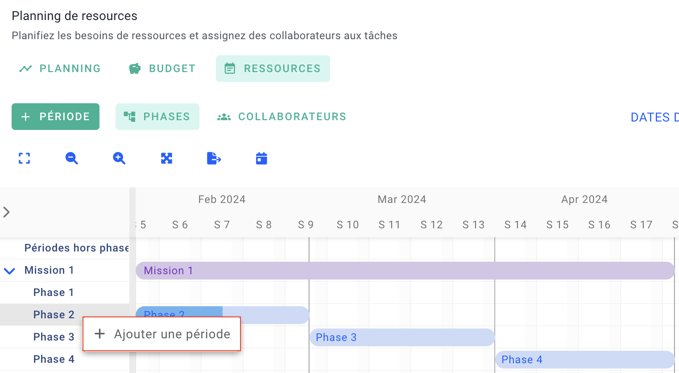
📌 Period creation
Users will have several choices regarding the creation of work periods on this version of the resource schedule.
The first method is the traditional method using the "+Period" button, which allows you to create a period without any pre-filled information in the modal.
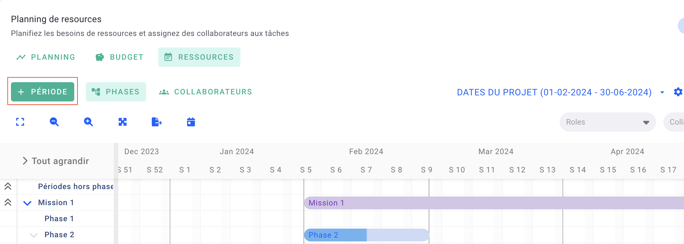
The second method consists of double-clicking directly on the phase or fee project.
If the user chooses this method, the dates and other information relating to these elements will be pre-filled into the period, saving time.
The first method is the traditional method using the "+Period" button, which allows you to create a period without any pre-filled information in the modal.
The second method consists of double-clicking directly on the phase or fee project.
If the user chooses this method, the dates and other information relating to these elements will be pre-filled into the period, saving time.
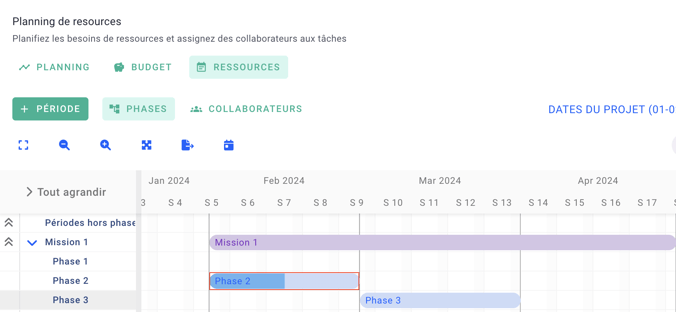
The third method is click and drag. Users can now click and drag on a phase or fee assignment to create a period.
The period will contain the information entered.
The period will contain the information entered.
The fourth method consists of right-clicking on the phase in the left-hand menu and clicking on "Add a period".
This method will create an unassigned period with the start and end dates of the phase in question.
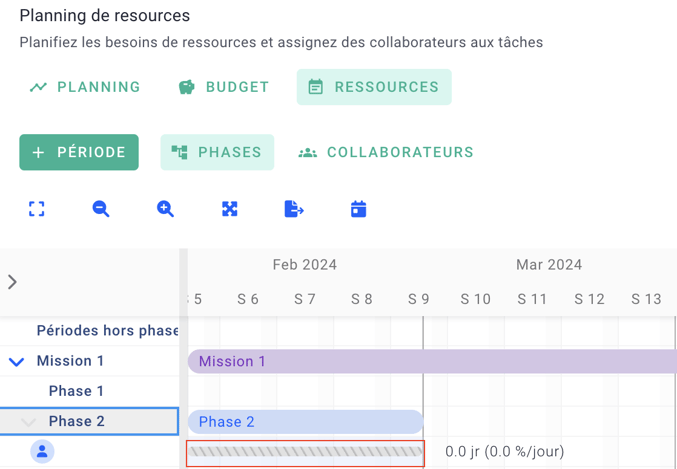
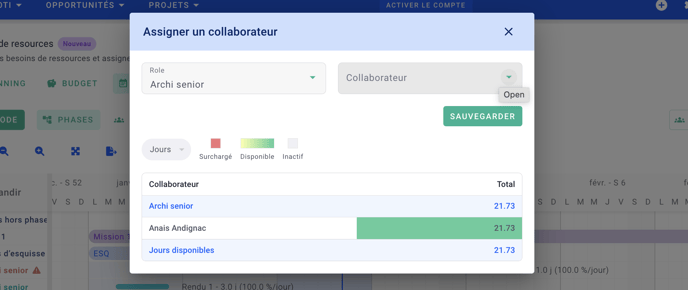
Assign your unallocated periods to collaborators by right-clicking on the greyed-out period.
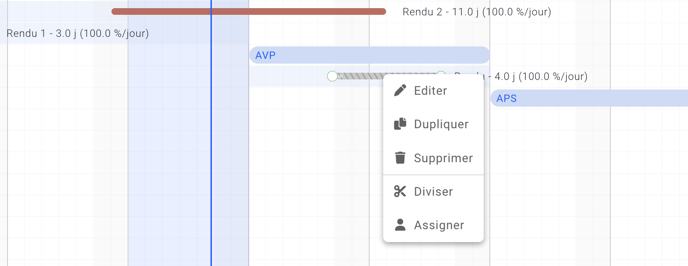
Then select the employee according to their availability and the role pre-selected when the period was created.
This method will create an unassigned period with the start and end dates of the phase in question.
Assign your unallocated periods to collaborators by right-clicking on the greyed-out period.
Then select the employee according to their availability and the role pre-selected when the period was created.
📌 Indicators
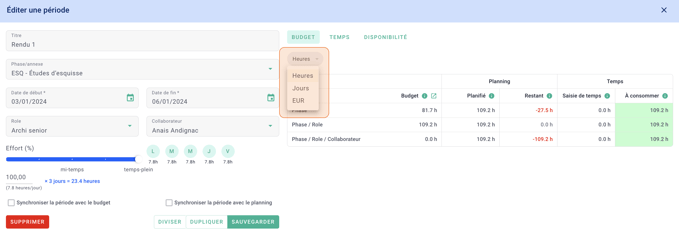
Users can choose to view their indicators in three ways: Hours, Days, Currency (EUR).
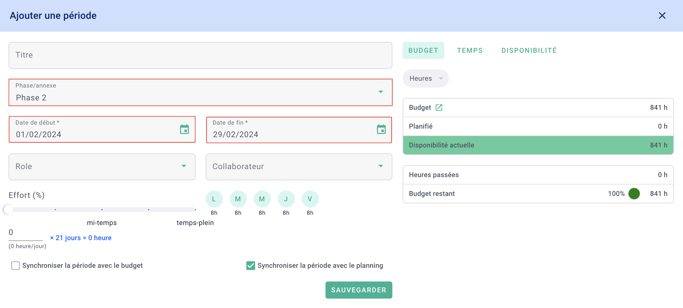
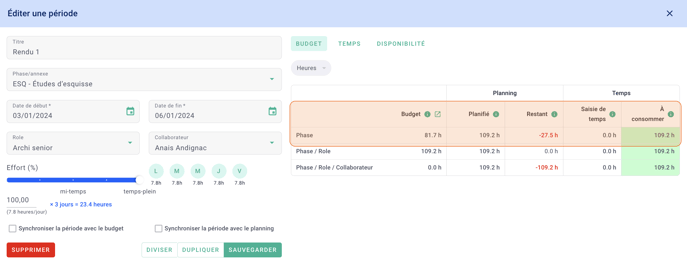
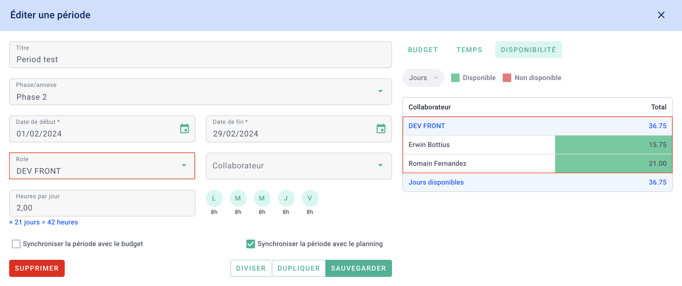
Budget
We've added budget indicators to each work period so that users don't have to navigate to their budget page in parallel to manage their projects. Users can now see their budget, what has been planned and the remaining availability.
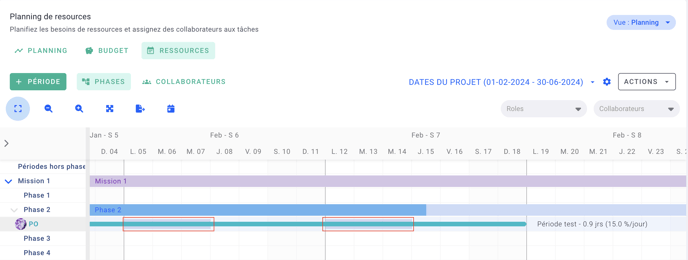
In the screenshot below we can see that :
In the screenshot below we can see that :
We've scheduled a full-time schedule for the period (100% of the days) over 3 days, i.e. 23.4 hours (shown at bottom left).
We can see that we have 81.7 hours of budget, 109.2 hours planned, so I've already planned too many hours compared to the total budget for my phase (27.5 hours over budget). You can see that the time entry is currently empty, so I can still enter hours for this phase.
The hours budget is calculated per period according to the role in the period. Here I've got a budget of 81.7 hours because I'm in the period of a senior architect, but my hour budget will vary for the period of an associate or assistant depending on their billable rates.
NB: The phase line takes into account the fees for the phase and all the periods created during that same phase, all roles combined.
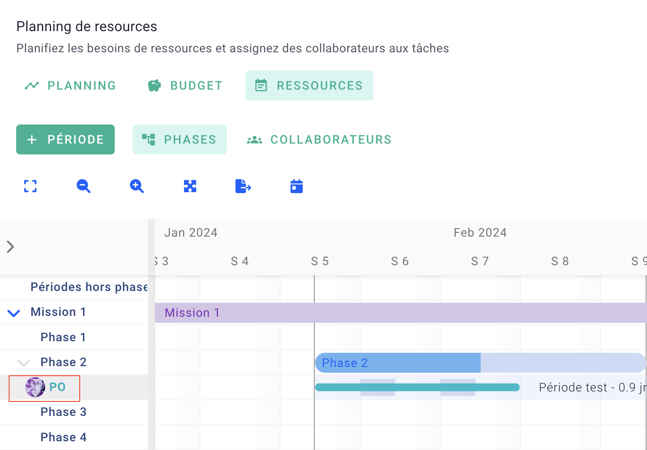
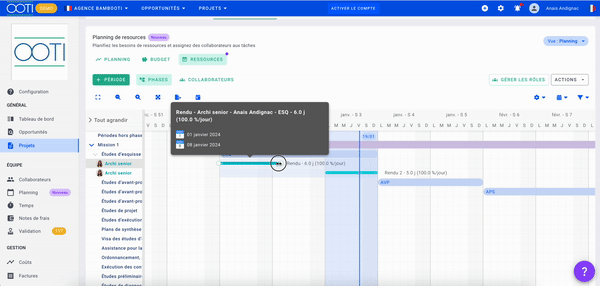
Time
The hours spent are calculated on the basis of the timesheets validated during the phase for the assigned employee.
The indicator is updated according to the timesheets validated.
These timesheets can be found in the "Time" tab for the period.
In addition to the timesheets, this tab shows the progress of the production phase, which is already visible on the schedule, and also the consumption for the period (time spent compared to the time planned).
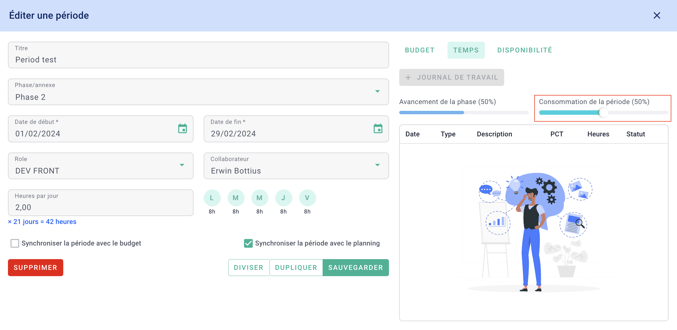
It is possible for users to update this value manually or to automate its update according to the timesheets entered. The module is activated by default for automatic synchronisation, but you can deactivate it by going to the top right of your first name > settings > modules > general:

The hours spent are calculated on the basis of the timesheets validated during the phase for the assigned employee.
The indicator is updated according to the timesheets validated.
These timesheets can be found in the "Time" tab for the period.
In addition to the timesheets, this tab shows the progress of the production phase, which is already visible on the schedule, and also the consumption for the period (time spent compared to the time planned).
It is possible for users to update this value manually or to automate its update according to the timesheets entered. The module is activated by default for automatic synchronisation, but you can deactivate it by going to the top right of your first name > settings > modules > general:
Availability
By default, we show availability for the date ranges selected, but users can choose a role to see the availability of their colleagues according to the role assigned.
By default, we show availability for the date ranges selected, but users can choose a role to see the availability of their colleagues according to the role assigned.
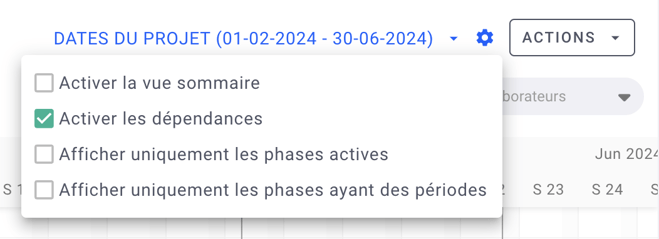
📌 Phase dependencies
It is now possible to link phases together to ensure that dates are always connected. Users will be able to link end dates to a start date or two start dates to each other as required. Simply click on the end of a period and connect it to the end of another period to link them.
⚠️ Phase dependency must be activated in the actions menu before it can be used.
⚠️ Phase dependency must be activated in the actions menu before it can be used.
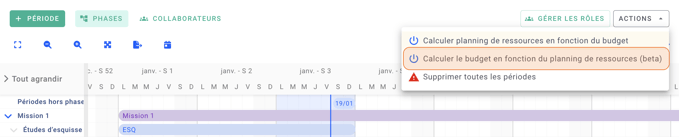
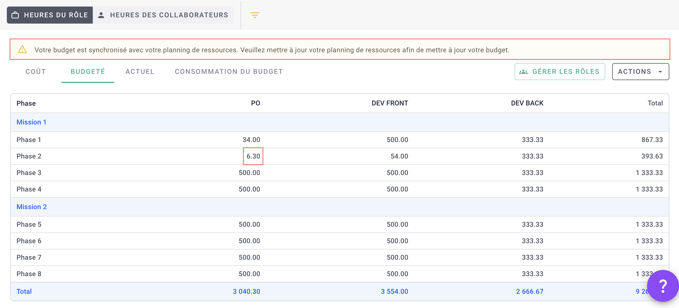
📌 Synchronising the schedule with the budget
Until now, users could synchronise their schedule with their budget so that the schedule updated automatically.
We now allow the opposite, users will be able to link their budget to their schedule and the budget will update according to changes in the schedule.
This feature is available in the 'Actions' menu.
⚠️ When this synchronisation is activated, the budget automatically becomes read-only and the user can only update it via the resource schedule.
📌 Macro view of workload
We've improved the availability tab to give our users visibility of their workload.
This new table can be filtered by period (e.g. 6 months) or frequency (days, months etc).
The data displayed can be the employee, the workload in days or the workload in hours. The various boxes change from green to white depending on the workload assigned to the employee.
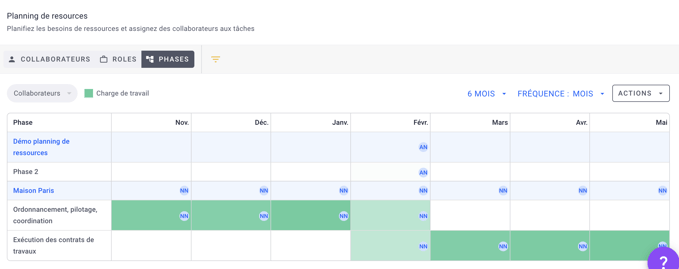
This new table can be filtered by period (e.g. 6 months) or frequency (days, months etc).
The data displayed can be the employee, the workload in days or the workload in hours. The various boxes change from green to white depending on the workload assigned to the employee.
------------------------------------------------------
Thank you for your continued feedback on OOTI, it has greatly helped us to improve the platform and the service we provide.
We are always happy to have your feedback so that we can understand your needs and improve the performance of OOTI.
If you have any questions about the product, comments or requests for modifications, please don't hesitate to contact us at support@ooti.co or directly from the chat at the bottom right of your web browser.